Skip to Main ContentAdditional Site Navigation
Nikon ImagingUSAAmericas
  1. thumbnail image

Nikon Global (View in a new window)
Categories
Astrophotography Landscape

Astrophotography & Winning the Nikon Photo Contest

Dan Stein photo of the Milky Way in the sky over a snow covered landscape
Big Slidebow. A 39 image panorama of the entire Milky Way arch as captured from the summit of a hike in the Adirondacks, NY. I used my star tracker to capture the star images along with a panorama head mounted to the tracker to make the overlap calculations for each panel seamless and then waited around until blue hour to capture the foreground with the camera in the exact same position. All images captured with my Z 6 and NIKKOR Z 35mm f/1.8 S.

Dan Stein has a day job. Nights though, are for astrophotography. Dan—who considers himself to be a creator because as he says, “he’s not simply photographing a scene, but showcasing an experience”—can spend months or years planning for a specific image.

Dan’s foray into astrophotography began when he was a freshman in college and had an assignment to draw the phases of the moon. As he explains it, he can’t draw so he talked his professor into letting him photograph the phases of a moon using a DSLR. That brought an invitation to view and photograph a meteor shower at a nearby dark sky location and as he says, “That night I literally took a shot in the dark and fell in love with astrophotography.”

Dan Stein photo of star trails over the Adirondack Mountains, NY
The Beginning of the World. Over 5 hours of images combined to illustrate the path of the stars as the Earth rotates seen over the Adirondack Mountains, NY. Peak fall foliage and a cloud inversion illuminate the landscape below. All images captured with my Z 7 and NIKKOR Z 50mm f/1.8 S.

Why astrophotography?

Astrophotography is rewarding on so many levels. There are nights where you might be half asleep shooting a meteor shower, then BAM! One massive meteor streaks across the sky and suddenly you feel more alive than ever. It is this very sense of pure awe of the show for which the cosmos display for us.

Dan says the more he shoots, the more challenges he’ll create for himself.

There are no boundaries in how I can create a piece that speaks to me. Maybe it is going for an even more difficult hike or trying to achieve even more detail in my shots by mosaicing while tracking or going for a scene that combines elements of both deep space astrophotography and nightscape astrophotography. All of this combined allows for each night under the stars to be even more rewarding.

Astrophotography 101

There are a lot of techniques I use to photograph our sky, oftentimes I combine them as well. I use a portable star tracker which I can take on hikes with me. While this complicates the whole process, the tracker allows me to capture a ton of detail in our night sky.

A star tracker—also known as an equatorial mount—basically allows you to move the camera as the earth moves when taking long exposure photos of the night sky. Without one you won’t be able to take a very long exposure.

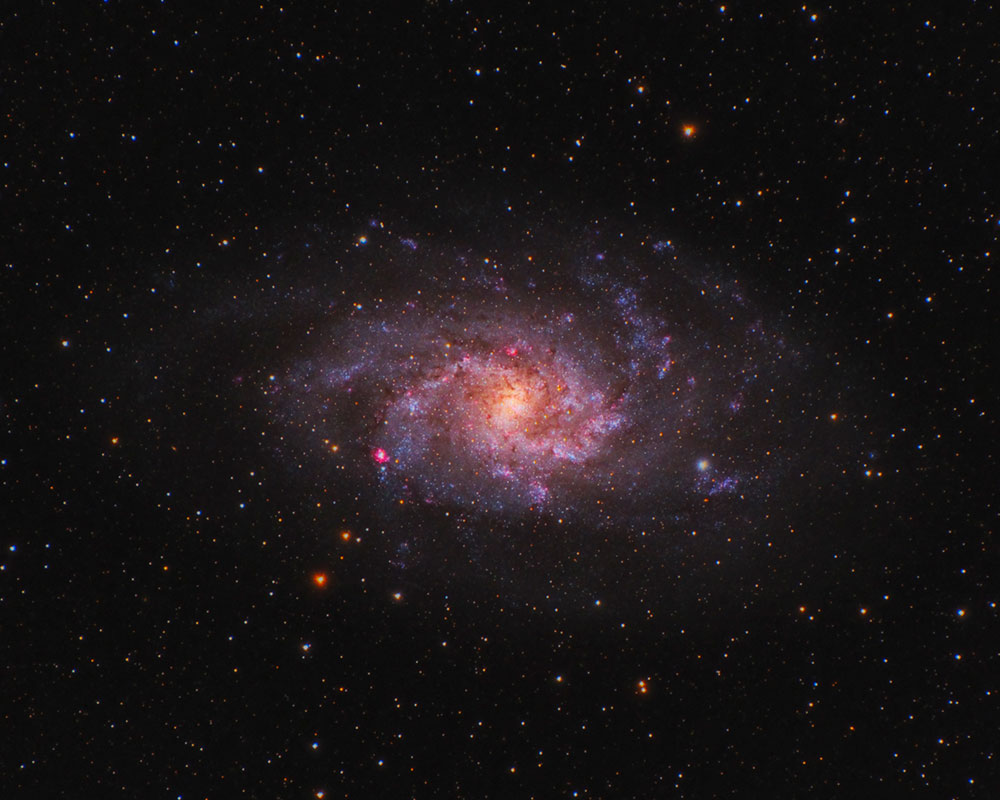
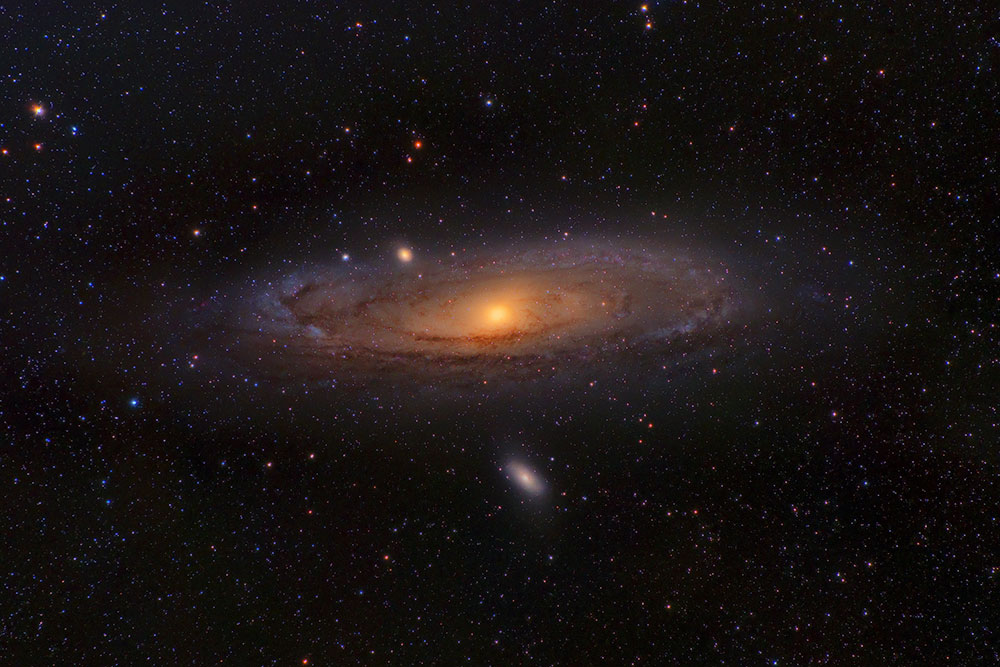
Depending on the image being created, Dan may also stack images, combining differing exposures for the sky vs the foreground landscape. Stacking, which uses software in post-production also gets rid of noise and is critical when shooting deep space objects like galaxies or nebulae.

Dan Stein photo of the M33 galaxy
Messier 33, also known as the Triangulum galaxy. 170 30-second exposures were combined taken at 500mm using my Nikon Z 6, Mount Adapter FTZ, with the AF-S NIKKOR 200-500mm f/5.6E ED VR and my portable small star tracker. Taken from a dark sky spot in PA.

Danscapes

Visit Dan’s website and you’ll see a gallery of Danscapes. We had to ask, just what are Danscapes? They’re Dan’s take on landscapes. “Since I am mostly an astro guy at heart, I figured I would just put a twist on the word landscape by flipping around the letters a bit to spell my name,” he explains.

Dan Stein photo of the Milky Way in the sky over a lake and mountains
Nikon Photo Contest Winning Image. By the Bells. The Milky Way setting over the Maroon Bells in Colorado. A record snowpack year allowed for snow to linger around long enough where the summer alignment of the Milky Way atop the snow-capped peaks was able to be captured. I used my star tracker to capture the stars and turned the tracker off to shoot the foreground images in the exact same camera position otherwise both the reflection in the lake below as well as the foreground would have become blurry from the tracker. But I still wanted to get a nice clean and sharp foreground, so in order to reduce the noise due to everything being so dark, I shot a bunch of images all back to back and stacked them. All images captured with my D850 and AF-S NIKKOR 14-24 f/2.8G ED.

Nikon Photo Contest

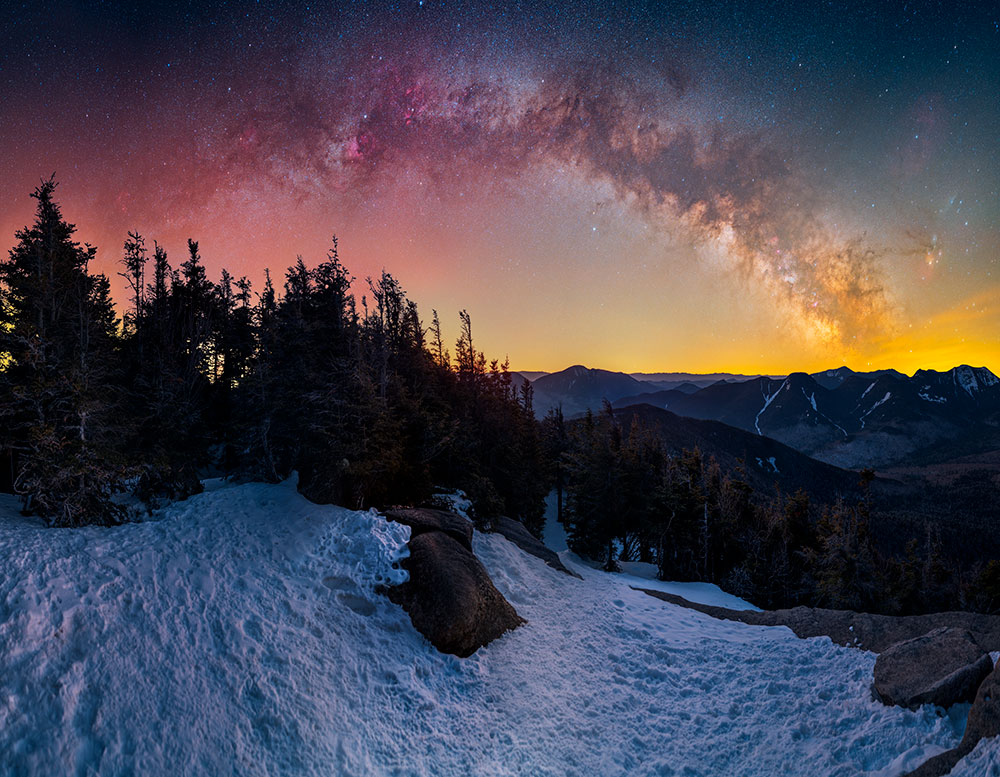
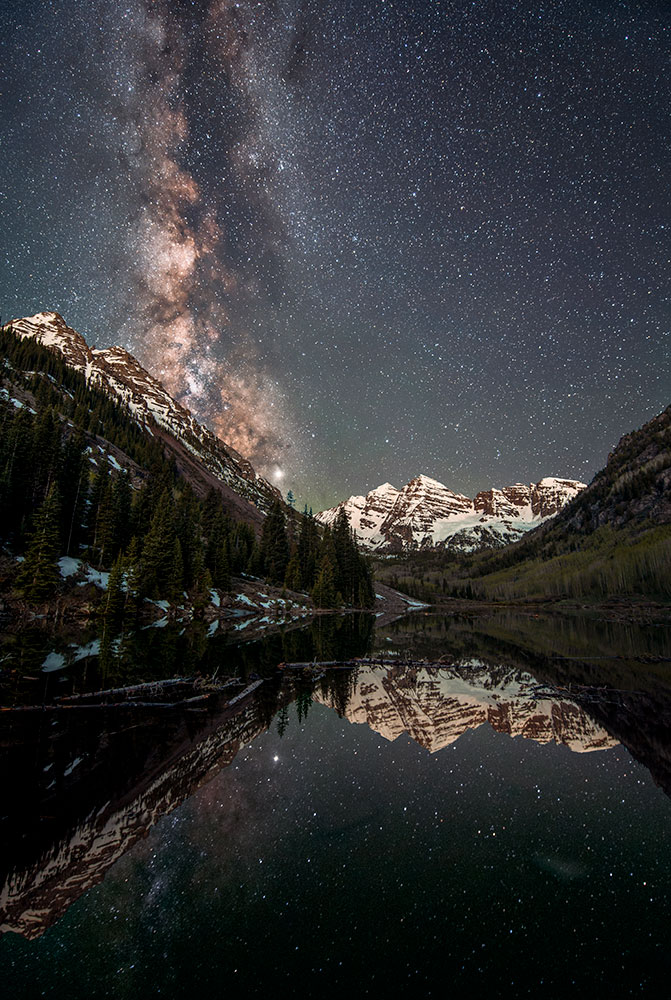
A couple years back, one of Dan’s nighttime landscapes, By the Bells (above) was one of the winning images of the annual Nikon Photo Contest. Dan says that it’s one of his favorite images of all time. He tells us the story behind the image which features the Milky Way.

Nearly 5 years ago my friends and I went on a road trip through Colorado and the Southwest US. We arrived at the location and I set up my tripod but the sky was 100% clouds. After shining our flashlights around the perimeter of the lake we could see a good number of eyes watching us and decided to retreat to avoid becoming dinner.

The next year, I attempted the shot again. I’d driven offroad for nearly four hours and was on the last leg of my drive when I was stopped by a police officer wondering why I was out at such a late hour. I showed him my camera and explained what I was going to be photographing. The stop had cost me time. I rushed to the location and began my setup. I only had a few minutes to shoot before blue hour began which would wash away the Milky Way. Finally, I got my shot. I had a dilemma though. Stay another 30 minutes and risk missing my flight home to get the foreground and lake stack layers as clean as possible or shoot a quick noisy shot to play it safe. I took the risk, even though I had to be at work early the next morning.

Winning!

I love this image, but I never thought it could win any awards, and a Nikon award for that matter. I honestly thought the email was fake when I received word that I had won. I won a Z 5 full frame mirrorless camera which I use for b-roll/reels.

Being shy about bragging on social media, Dan’s friends took it upon themselves to spread the love on his behalf. He’s received positive feedback in regards to winning and about the image itself.

Dan is one to pay it forward. He’s been fortunate enough to have folks offer pointers when he’s been stuck, and so he feels it’s important to return the favor to people who may seek inspiration in his own work.

I think laying out all of the tools and techniques I use to create my shots also demonstrates the transparency in this process. Often times an astrophotograph can be misunderstood for being digital art or altered heavily, when in reality there is just a significant creative process behind each image.

Dan Stein photo of the M31 Galaxy
Messier 31, the Andromeda Galaxy. The relative size of this galaxy is 5x larger relative to the Moon in our sky, however it is too dim to be seen like the Moon. This image consists of only a little over an hour of data taken using my Z 6, Mount Adapter FTZ and AF-S NIKKOR 200-500mm f/5.6E ED VR with my equatorial mount from the heavily light polluted skies of NJ.

Dark Skies—Few and Far Between

One thing I want to point out is that as light pollution spreads, dark skies are becoming even more challenging to find. Pair that with waiting for the phase of the moon to be where you need it (new moon as opposed to full moon) and the weather to cooperate, then throw in the mix of needing to hike up mountains to capture certain landscapes—astrophotography requires a lot of practice and patience.

Dan says he knows there is still much he can learn. “I encourage anyone who wants to try astrophotography to acknowledge that there will be a lot of ups and downs, learning does not happen overnight,” he says, adding, “it is important to embrace the difficult nights out just as much as the successful ones. Have patience, and remember the skies will be there for us, even if that means going a little further out of the way to find them.”

Categories
Landscape Photographic

Photographing Nature on a Different Wavelength

Photo of trees with white foliage against a blue sky taken using an Infrared converted Nikon camera by Chris Baker
Bald Cypress Boardwalk at the Wheeler Wildlife Refuge in Decatur, AL. Nikon Z 5 converted with an internal 590nm IR filter, NIKKOR Z 14-30mm f/4 S lens at 14mm focal length, f/13, 1/50 sec, ISO 100.

Chris Baker regularly photographs nature on a different wavelength. Literally. Don’t know what we mean? We’ll explain. Chris uses Infrared (IR) photography techniques to create otherworldly images.

Chris has a day job, as an engineer for NASA and while you might think that photography as an art and engineering are polar opposites of one another, Chris explains that he uses the same thought processes for both.

While photography is considered an art, there is a science and technical side that engages my engineering, problem-solving side. My initial goal was understanding how the camera works, which came very natural for me. Once I had a fundamental understanding of the science of shutter speed, aperture, ISO, lenses, sensor types, and histograms, I felt like I could adapt to any genre of photography.

Another parallel between engineering and photography, is my approach to shooting. When I’m confronted with a scene, I treat it like I would any engineering problem. I go through a logic or decision flow that will guide my creative choices. What lens is required? Am I wanting to control depth of field (aperture) or motion (shutter speed)? Is a filter required? Should I shoot from a high perspective or low?

For Chris, the small details matter. And perspective is used to engage the viewer of his nature and wildlife images. He’ll deconstruct his favorite photos to understand why he’s drawn to them, then look for opportunities to apply those techniques in his own work.

Photo of a dandelion taken using an Infrared converted camera, by Chris Baker
Dandelion in Madison, AL. Nikon Z 5 converted with an internal 590nm IR filter, Mount Adapter FTZ, AF Micro-Nikkor 200mm f/4D IF-ED lens, f/13, 1/500 sec, ISO 160.

Infrared Photography Primer

Chris first ventured into Infrared photography in mid-2021, using a filter on the lens of his Z 6II. Within a short time he was hooked and invested in a converted Nikon camera body the next year.

Chris explains that the Hoya R72 (720nm) filter is a popular starting point for Infrared photography. It produces very strong, traditional monochrome Infrared images because it limits the amount of visible light entering the lens. And with some post-processing finesse, can generate false color images.

“The trick,” he says, “becomes working around the internal IR blocking filter incorporated into DSLR and mirrorless camera bodies.” You’ll need to use long shutter speeds, even on a bright sunny day, up to 30 – 90 seconds, which will limit you to shooting subjects that aren’t moving.

Trees in a nature preserve photographed with an infrared converted camera by Chris Baker
Hays Nature Preserve in Owens Cross Roads, AL. Nikon Z 5 converted with an internal 590nm IR filter, NIKKOR Z 14-30mm f/4 S lens at 21mm focal length, f/10, 1/80 sec, ISO 100.

Inner Workings of Infrared Photography

Visible light occupies a very small part of the electromagnetic spectrum with wavelengths ranging from 380 to 750nm. Infrared is at the longer wavelength, just above (>750nm).

All standard digital cameras have an internal, physical filter that blocks IR wavelengths from reaching the sensor. When converting a camera for infrared, this filter is removed and replaced with a filter that accepts the longer IR wavelengths (rejecting the shorter visible light wavelengths).

If you’re only interested in pure B&W images and maximizing the natural contrast of IR, then an 830nm can be installed that will accept only IR wavelengths (> 830nm). However, if the photographer is interested in generating false color images, a filter is installed with a wavelength cutoff that allows a mixture of visible and IR light. The more visible light allowed, the stronger the false color image. These “color” IR filters will have wavelength ranges from 720nm (weak color) to 470nm (strong color).

Fortunately, special lenses are not required for infrared.

But, photographers shooting with Infrared converted DSLR cameras have to compensate while focusing for the fact that there’s a difference in the wavelengths of Infrared light vs. visible light. You’d do this by either calibrating the focus of your AF lenses to work properly or manually focus and use the red IR focus scale on the lens.

Mirrorless cameras however, due to their design, actually compensate for the focus shift and are ideal for converting to Infrared photography only.

The other issue you may run into with your lens choice is a lens “hot spot” or bright, hazy circle that appears in the center of an IR image mainly due to the anti-reflective coatings on the lens. Hot spots vary in degree with some lenses being unusable and others exhibiting nothing. Mild or light hot spots can be corrected in post-processing. Fortunately, lens databases have been created to characterize hot spot potential and should be consulted when selecting lenses for IR photography.

Lastly, you’ll want to set a custom white balance, either in the camera or in post-processing software. My workflow involves the latter. Even with a proper white balance, the skies in false color IR images will take on a red tone. So, I’ll use Adobe Photoshop to perform a “channel swap”, where the red and blue channels are swapped to restore the sky to blue. Then further adjustments to the other color channels can manipulate the hue and saturation of foliage to yellow or pink or white.

Red Waterfalls photographed by Chris Baker using an Infrared converted camera
Mardis Mill Falls in Blountsville, AL. Nikon Z 5 converted with an internal 590nm IR filter with an external 16-stop Neutral Density filter on the lens, NIKKOR Z 14-30mm f/4 S lens at 25.5mm focal length, f/10, 30 sec, ISO 125.

Chris has one Nikon Z 5 that is converted to Infrared with a 590nm supercolor filter.

This filter allows me to produce strong false color images, while still retaining enough contrast to convert into B&W in post-production if I decide to produce a more traditional monochrome IR image.

For scenarios where I know I’ll want a black and white image, I’ll attach my 720nm external filter to limit the visible light even further and isolate more of the IR spectrum.

Eye-catching Subjects

Chris says nature and landscape photography is his first love. Noting that Infrared photography is at its most effective in nature scenes with the way foliage and water and sky contrast. Objects that absorb IR light, such as sky and water, will render very dark and objects that reflect IR will render very bright.

It’s such a different and distinctive look that cannot be replicated in software. I’ve always enjoyed the challenge of taking something familiar and finding a unique way of shooting it, whether it’s trying different lenses or changing camera angles or experimenting with artificial lighting. Infrared is yet another tool to add to my toolbox for this purpose.

With monochrome IR imagery, textures and patterns in nature that are normally hidden by dark greens in leaves or bright colors in flowers become more prominent. In false color imagery, I’m not bound by traditional colors. Trees and grass can become yellow or magenta or pink or blue and give a scene a dream-like or other-worldly quality.

We asked Chris which subjects he felt worked better for Infrared photography.

Any scene with live foliage tends to look better in infrared because the typical green leaves and blue skies are not a dynamic color combination.

Think about the popularity of photographing fall foliage, he explains, where photographers will flock to capture the changing leaves because they’re more interesting and appealing to see. IR offers this same visual appeal but I can shoot in the middle of the day in the heat of the summer and generate a false color image of a tree in pink or yellow contrasted against a deep blue sky. Or, take that same scene and render it in B&W to make the foliage appear white against a black sky giving the scene a wintery look.

Photo of yellow foliage on trees and grass against a deep blue sky, infrared photography by Chris Baker using a converted camera
Soybean Sunrise in East Limestone County, AL. Nikon Z 5 converted with an internal 590nm IR filter, NIKKOR Z 14-30mm f/4 S lens at 24mm focal length, f/11, 1/400 sec, ISO 100.

Problem solving

While Chris has a love for nature and wildlife, he says he’ll experiment in most other genres as it satisfies his problem-solving nature. “Each has its own unique challenges and I love that problem solving aspect and opportunity to expand my knowledge.” He also does a lot of macro shooting—of flowers and insects.

He says that the most successful images document some type of interesting behavior.

“To capture those moments requires patience, persistence, a tolerance for bugs, and a willingness to get dirty, as I prefer to shoot from very low angles”, he concludes.

Categories
Landscape Street

Reinvention: Pushing Creativity

Manny Khan photo of a park bench with autumn leaves on it
The beauty of the fallen leaves saying goodbye. Flushing Meadows Corona Park, N.Y.

Manny Khan’s photographic journey began with the camera in his smartphone, and after a couple years of sharing images socially and generating positive feedback, Manny wondered about the possibilities that lie with a real camera. His first camera was a Nikon DSLR. Manny used that camera to teach himself about exposure, settings, and by watching how-to videos on YouTube and experimenting he found his niche and style. He’s since upgraded to a Nikon Z 7II mirrorless camera that fits his “evolved style of shooting”, as he notes.

His inspiration comes from the endless picturesque streets, waterfronts and skyline of NYC—year-round, being able to photograph these familiar subjects under different weather and lighting conditions.

Manny defines his work as storytelling through his compositions: “combining available light, shadows, color and textures that evoke emotion and drama in my photos.”

Manny Khan photo of a park bench and streetlamp in the snow
Winter wonderland in Roosevelt Island N.Y.

Challenge Yourself

When you’re photographing a similar subject often, you end up challenging yourself to make each image uniquely different from the last. The perspectives in the city are unlimited, lending to the myriad ways of photographing one subject so differently each time.

“The layout of NYC park benches is very intriguing to the eye. Pairing that with city views and lamp posts provides me opportunities to experiment with depth of field to frame my shots with the NYC skyline.”

He’ll often use low-angled perspectives or experiment with different points of view to draw the viewer into the image. Manny explains, “[With] Park benches in particular I look for foreground and any elements such as wooden textures and leading lines that may add to the dynamics of the shot.”

Manny Khan photo of a park bench covered in cherry blossom petals
The fallen blossoms beautifying the empty bench. Roosevelt Island, N.Y.

The Beauty of Cherry Blossoms

“Cherry blossoms are signs of new life. Their life cycle is short lived, yet they are so symbolic. I have always loved the unique beauty of cherry blossoms and the positive energy they evoke in people. During the month of April every year, it is an absolute delight to capture the cherry blossoms in NYC, particularly on Roosevelt Island.”

Photographing cherry blossoms on park benches allowed Manny to capture two of his favorite subjects—the blossoms and the park bench. He explains, “In the image of the cherry blossoms looking through the arm rest (above), the drizzle and gray skies helped achieve the moody tones for that image.” The image of the bench at night with the city in the background (below) used the same technique, but at a different time of day. Manny was able to use the light from the lamp post in the scene to provide additional lighting, to showcase the rich texture of the bench and compose the image with deep colors.

Manny Khan photo of a park bench at night with the NYC skyline in the background
Escaping into the blue hour. Gantry Plaza State Park, N.Y.

The Scene Makes the Image

Choosing how to photograph a landscape or cityscape can be subjective. Do you go out to shoot in bright sunshine or wait for gloomy, stormy days? Each of those images will give the viewer a different message. Manny says, “I generally compose my images of the locations I visit based on the weather conditions, surroundings and available light.”

“During cloudy and rainy days, I’m captivated with the gray skies, fog and soft light of the atmosphere—incorporating that with shadows and reflections to compose a dark and moody image, sometimes incorporating people with umbrellas which I feel adds to the storytelling of that particular image.”

Manny Khan photo of a park bench and cherry blossom tree
The fallen blossoms under the gloomy skies. Roosevelt Island, N.Y.

“On bright and sunny days, I love to capture the crisp blue skies and glow of sunlight. Those bright and colorful days are also perfect for nature walks and capturing the deep greens, yellows, and oranges.”

The next time you’ve got the urge to go out to shoot but don’t really have a subject in mind, don’t be afraid to challenge yourself to take a new look at an old, familiar subject.

Categories
Landscape Photographic

Bold Composition

Soft morning light graces wildflowers and coastal plants along the Sonoma Coast, California.

David Thompson is an ordinary guy with a love for landscape photography. And with his images, he brings the viewer along on this journey to view the world’s natural beauty. His distinct style shines through images that speak volumes for themselves. Bold, vibrant colors and strong lines fill photographs that utilize light for added compositional effect.

“Landscape photography has made me have an appreciation for nature and the world we live in. My goal as a landscape photographer is to capture an intimate moment and bring the viewer into the scene as if they were standing right beside me.”

As the sun rises to the east and starts to creep over the nearby mountains, the expansive field of saguaro cacti, becomes backlit, bringing the desert to life. Saguaro National Park, Arizona.

Composition is a key component with David’s imagery, using strong leading lines, or if the scene demands it, contrasting colors, dark to light transitions or overlapping layers. “I like my images to have some type of visual flow and balance,” he explains.

David defines his work as diverse, quiet, reserved, subtle, with a little spice and flavor. Like other creators, he finds inspiration in many forms: in music, other landscape photographers, family and friends, and from ordinary everyday people trying to uplift others.

“What I love about the landscape is each one speaks differently and has its own unique character. I enjoy photographing these various characteristics of the landscape, as I find it intriguing and fascinating.”

David’s favorite time of day is sunrise, when soft light gives way to scenes awash with color. “The landscape is still and quiet first thing in the morning. I will always enjoy the soft pre-dawn light,” he says.

Many of his other images feature bold pops of color, strong lines carving through the landscape and often one color blanketing an entire scene, only to be broken up by highlight and shadow.

The midnight sun of summer breaks through the clouds to the west, displaying magical light, at one of Iceland’s most beautiful waterfalls on the Southern Coast. Seljalandsfoss, Iceland. Using a small aperture of f/16 allowed for the starburst effect.

Go Big or Go Small

Landscape photography often encompasses everything from the smallest of minute details to wide open vistas.

Incoming waves pound a small sea cave along the northeastern coast of Maui during a winter sunrise. Waianapanapa State Park, Maui, Hawaii.

“For me, I enjoy photographing smaller scenes. These are the scenes that people tend to overlook. The smaller scenes are challenging, as they don’t just stand out like the wide vistas. I think this is what makes the images more rewarding, when you can capture something unique and different. I also like that the smaller detailed scenes, because these are scenes that you can call your own.”

Glacial rivers meander seamlessly over the volcanic landscape like a paint brush on a canvas, on the Southern Coast of Iceland.

David offers the following advice for other landscape photographers: “Be yourself, be humble, be patient, accept the failures…small or big, trust the journey, dare to be different, take risks and step outside of the box with your imagery; and let the light dictate how and what you photograph.”

Categories
Landscape Photographic

Water. Powered.

Jeremey Jamieson photo of Niagara Falls
Niagara Falls at sunset in New York. Captured on the Nikon Z 6 and the NIKKOR Z 24-70mm f/4 S.

Have you ever looked at images of waterfalls with the silky smooth look to the water and thought to yourself, how did the photographer do that? Jeremey, fascinated with water and the power it holds was hooked from the first long exposure waterfall image he saw. It doesn’t hurt that he’s only about 10 minutes from Niagara Falls in New York, which made it easy to practice the technique. The Finger Lakes region is full of picturesque waterfalls and is also accessible to him by car.

Jeremey’s images have a strong sense of mood. He defines his work as “something different with a slightly cinematic feel to it.”

Since many picturesque spots are also popular “instagram spots” Jeremey says he’ll make that quick shot but immediately look for a new angle or perspective to create something uniquely different from the crowds.

My favorite times to shoot are during sunset and sunrise. I love the light produced during these times. When the sun is low in the sky, it can create some great shadows which helps with the mood. I also tend to shoot a little underexposed to protect the highlights.

When everyone is shooting a sunset, I’ll turn around and see what’s behind us.

I try and push my colors around and find a unique look for a scene. Some of my favorite photographers have created a unique aesthetic and I strive to find my own as well.

Inspired by nature

Jeremey finds inspiration from nature.

Photography lets the busy world slow down and slip away for a few minutes. I always aim to try and show the viewer something they have never seen before.

One may think that a landscape photographer just goes out and snaps whatever scene is in front of their camera, but that isn’t always the case.

Whenever I plan a shoot, I spend a lot of time beforehand planning what types of shots I want to capture. I tend to look for natural lines. Once on a location, I look around for things I can use in frame, rocks in the water or a fallen tree. My goal is to try and create an interesting image. Sometimes that means sticking my lens through nearby trees or bushes to get a frame around my subject. I love layers and depth in my images. The foreground of a landscape is incredibly important, sometimes as much as the main subject. Sometimes you can just get low to the ground to add some interest.

Jeremey shares this analogy: To me, it’s like the frosting on the cake. Yeah, cake is good, but it’s that much better with frosting. A landscape photo can be great but with an interesting foreground or framing, it can be that much better.

I always push myself to try and find a new view, to capture something different. I think that comes from shooting Niagara Falls. When a location is shot so often, you have to think differently to find something unique.

Jeremey Jamieson photo of Taughannock Falls
Taughannock Falls during autumn in New York. Captured on the Nikon Z 6 and NIKKOR Z 24-70mm f/4 S.

Step by Step

Jeremey finds that sunrise and sunset are the best times to shoot, as they can be quite moody and dramatic.

I love shooting at and after sunset the most. I love the warmth you get when shooting during sunset or sunrise. You can also get some colors in your skies that adds interest to your image. With the sun being lower in the sky, you can get more dramatic shadows and highlights. Blue hour is also a great time to shoot. The blue tones you can capture play well off of a warm sunset or sunrise image.

Go to settings:

  • Shutter speed is a 1 second exposure, adjusting it based on the flow of the waterfall. For high, fast flowing water, an image can often be taken with a somewhat faster shutter speed. Those with a slower water flow need a longer exposure.
  • He’ll also look at the surrounding scene, tree branches or bushes, and adjust the shutter speed to balance out the moving water to the moving foliage.
  • To pull detail out of the smooth water and the surrounding scene, Jeremey sets an f/stop at f/8 – f/11.
  • And he typically uses a 2-5 stop variable ND / Mist filter to help block the light for longer exposures. The mist portion of the filter helps to bloom some of the highlights for a dream-like look.

To me, a silky-smooth waterfall always looks good but there can be times when the waterfall has an interesting look when frozen in time. A higher fall can really help the water to create some interesting shapes.

Jeremey Jamieson photo of Chittenango Falls in autumn
Chittenango Falls during autumn in New York. Captured on the Nikon Z 6 and the NIKKOR Z 70-200 f/2.8 VR S.

Knowing your subject

Shooting at Niagara Falls can be a real gamble sometimes. The mist from the falls can really add some character to an image. It can catch the golden light from a sunset and really bring in some color. When moving the right way, it looks great, however the mist is at the mercy of the wind. There are times at the Horseshoe Falls when the wind blows the mist back into the falls which can block a good view. It can also soak your lens and equipment. Thankfully with the weather sealing in the Z 6, I don’t worry too much about it.

Whenever traveling, Jeremey is always on the lookout for a new waterfall to photograph. On day trips or family vacations, if there’s a waterfall in the area, he’ll plan to stop and shoot it.

Shooting new waterfalls is always thrilling and exciting but there is also comfort and familiarity shooting Niagara Falls. Being so close, I can run up to the park when I have some free time.

We asked Jeremey to share some advice for other landscape photographers:

  • Learn to shoot in all conditions.
  • Pay attention to your composition and adjust for distracting elements.
  • Experiment with different focal lengths and find your style. A wide-angle lens can show a large scene, full of interest. A telephoto lens will let you pick out details and find new looks.
  • Don’t be afraid to experiment.
  • Learn color theory. It can really help when editing colors and moving tones around without the image falling apart.